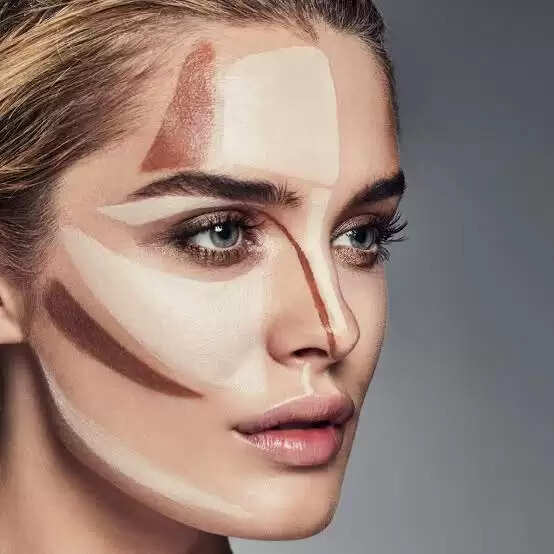
How To Contour Your Face With Makeup Explained

Contouring has remained a beloved technique in the makeup industry for many years, offering several benefits, such as enhancing cheekbones, sculpting the jawline, and emphasizing unique facial features. This method adds depth and dimension to your bone structure and overall makeup look. While it may seem daunting, mastering contouring is simpler than it appears.
Let's delve into what contouring entails, the best products to use, a step-by-step guide on how to contour effectively, and tips for customizing your contour based on your face shape.
Understanding Contouring:

Contouring is a makeup technique designed to sculpt the face, correct or enhance specific features, and create the illusion of slimmer or larger areas. It essentially involves adding shadows to define and refine facial contours.
Unlike highlighting, which uses light to accentuate features, contouring relies on darkening areas you want to define or make less prominent. It's all about simulating light and shadow to add dimension.
For example, a common contouring area is the hollows of the cheeks. By applying a darker shade here, you create shadows, making your cheekbones appear sharper and more prominent. Contouring can also be applied to the eyes, nose, brow bones, cupid's bow, or jawline. Regardless of the specific area, contouring tends to breathe life into your makeup look.
Contouring vs. Bronzing:
Contouring and bronzing are both techniques that add depth to your face, but they achieve this differently:
- Bronzer imparts warmth and a sun-kissed glow with warm tones. It can be shimmery or matte.
- Contouring uses cool-tone shades to add structure and mimic shadows. Contour products are typically matte.
Choosing Contouring Products:
Three popular makeup products are commonly used for contouring:
1. Powder Contour: Ideal for beginners, powder contour is easily buildable and blends smoothly. A matte finish is typical, making it suitable for oily skin.
2. Cream Contour: Cream contour sticks offer intense pigmentation and a natural finish. They work well with makeup sponges or brushes and are suitable for dry or mature skin.
3. Liquid Contour: Liquid foundation or concealer can also be used for contouring by selecting a shade darker than your skin tone. Liquid contour blends well with brushes or sponges.
How to Contour in 5 Steps:
1. Start by applying moisturizer, primer, and foundation as you normally would.
2. Contour your forehead by applying lines along the hairline and blending them smoothly.
3. Contour your cheekbones by applying product to the hollows of your cheeks and blending.
4. Optionally, contour your nose with lines on the sides and blend. Along your nose's bridge, use highlighter.
5. Finish with highlighter and bronzer for added glow and warmth.
Customizing Contour for Face Shapes:
- Round Face Shape: Start with the temples, move to the hollows of your cheeks, and continue along the jawline.
- Square Face Shape: Apply contour to the hollows of your cheeks, temples, and along the jawline.
- Rectangle Face Shape: Contour the hollows of your cheeks, forehead near the hairline, and edges of the jawline.
- Oval Face Shape: Focus contour on the hollows of your cheeks.
- Heart Face Shape: Contour around the temples and the hollows of your cheeks.
Customizing your contour according to your face shape enhances the overall effect and complements your unique features.

